Tutorial 5 - Task Scheduling
As mentioned before an AE can contain multiple PPTs. This is useful to make
RoboKudo adapt to different Perception Tasks. In the previous tutorials only
the query type detect was used. Right now, we only used this query type to
detect objects, however it could also be interesting to detect humans in an image.
In this tutorial we will take a look at a simple method that allows RoboKudo to
handle different Perception Tasks and we will teach RoboKudo to detect humans when the query
type is set to detect and the obj.type is set to human. This is called
Task Selection or Task Scheduling.
RoboKudo offers an annotator for this which is called QueryBasedScheduler().
It can be found in the src/robokudo/tree_components folder.
This annotator takes two parameters to construct such an annotator. The first parameter tasks
is a dictionary which maps the various pipelines to a unique key like this:
pipeline1 = py_trees.Sequence("pipeline1-name")
# ...
pipeline2 = py_trees.Sequence("pipeline2-name")
# ...
task_dict = {
    "pipeline1-key": pipeline1,
    "pipeline2-key": pipeline2
}
As you can see, a pipeline in this example simply consists of a sequence.
The second parameter of QueryBasedScheduler() isfilter_fn which takes a
function that is used to select the corresponding key for a pipeline in the tasks_dict.
It will receive the query automatically as a parameter and typically
decides which pipeline key to use depending on the query contents.
A basic function looks like this:
def task_selection(query) -> str:
    if query.some.condition:
        return "pipeline1-key"
    else:
        return "pipeline2-key"
This way the QueryBasedScheduler will use "pipeline1-key" if query.some.condition
is true to retrieve the pipeline that should be used from the task_dict
and otherwise it will use "pipeline2-key". This can of course contain more
pipelines and more conditions.
task_scheduling = py_tree.Sequence("Task Scheduling")
task_scheduling.add_children([
    QueryBasedScheduler(
        # ...
    )
])
Unlike other annotators the QueryBasedScheduler has to be put into its own
Sequence. This is because it cannot directly add other Sequences to the final
Pipeline but hast to add them behind itself in a Sequence.
Our goal is now to configure the QueryBasedScheduler step by step such that we can have our previous
object detection pipeline as well as a new pipeline to detect humans in the camera image.
Task 5-1: Create a second sequence similar to the
object_detectionbut for the human detection. Remove all children. We will fill it later.Task 5-2: Write a task dictionary with one key each for the
type=detect(object detection) andtype=detect+obj.type=human(human detection) pipeline. The values should be the corresponding sequences.Task 5-3: Create a
task_selectionfunction that selects the pipelines depending onquery.typeand thequery.obj.type.Task 5-4: Add the
QueryBasedSchedulersequence to the final pipeline in place of theobject_detection.
Now it is already possible to use the query scheduling. You can try it out
by restarting RoboKudo and sending the detect query. The same tree should be
visible in the webinterface as before. However, when sending the type=detect+obj.type=human query,
these annotators should be removed from the PPT.
To add the human detection capability we can now use a RoboKudo module called
robokudo_human_detection which contains the HumanAndPoseAnnotator(). The
module was already added to your workspace. You can find it in
src/robokudo_human_detection. As this is not an annotator included in the
base RoboKudo repository you have to import it a bit differently:
# Normal RoboKudo annotator
from robokudo.annotators.query_filter import QueryFilterAnnotator

# RoboKudo annotator from module robokudo_human_detection
from robokudo_human_detection.annotators.human_and_pose import HumanAndPoseAnnotator
You can then use it in the human detection pipeline like any other annotator.
Task 5-5: Add the
HumanAndPoseAnnotatorto the Pipeline, restart RoboKudo and send adetect humanquery
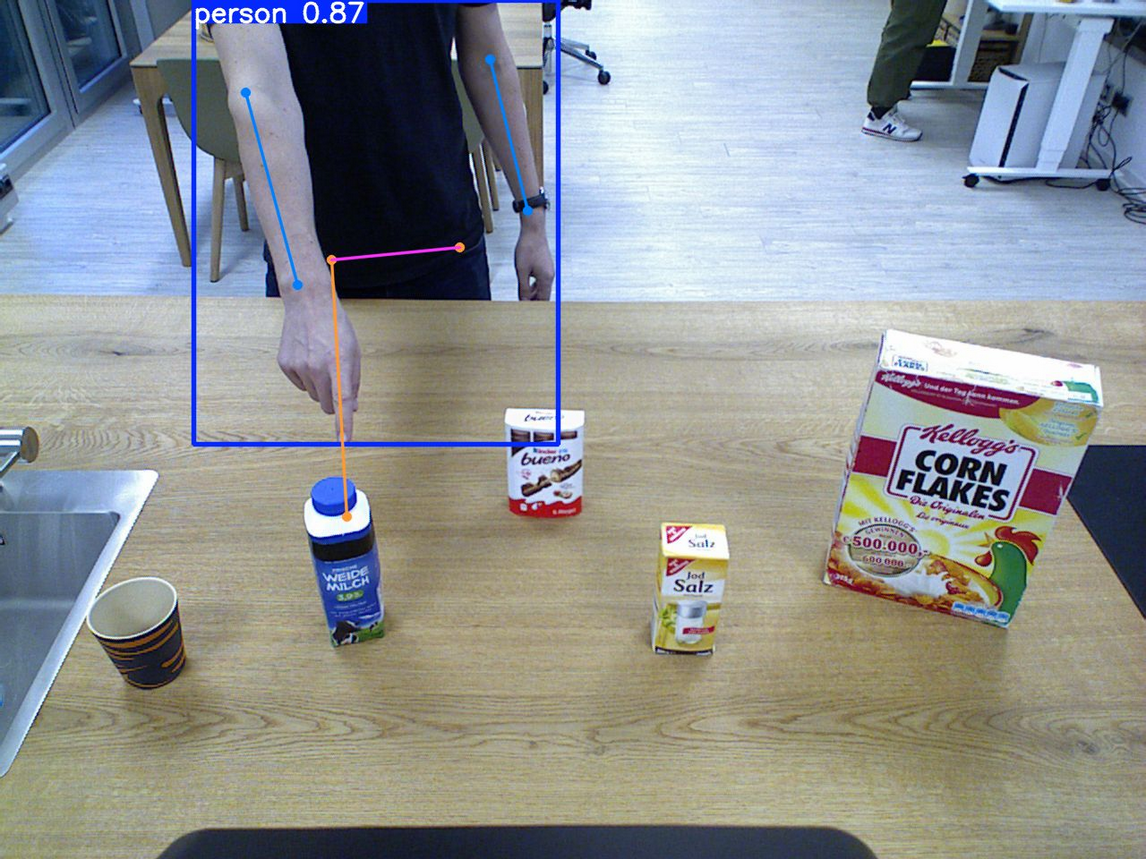
The output image of the HumanAndPoseAnnotator should look something like this:

The final code could look like this:
# ...
from robokudo_human_detection.annotators.human_and_pose import HumanAndPoseAnnotator
# ...

class AnalysisEngine(robokudo.analysis_engine.AnalysisEngineInterface):
    # ...
    def implementation(self) -> robokudo.pipeline.Pipeline:
        # ...
        object_detection = py_trees.Sequence("ObjectDetection")
        object_detection .add_children(
            [
                # ...
            ]
        )

        human_detection = py_trees.Sequence("HumanDetection")
        human_detection.add_children(
            [
                HumanAndPoseAnnotator(),
            ]
        )

        # ...

        def task_selection(query) -> str:
            if query.type == "detect" and query.obj.type == "human":
                return "human_detection"
            else:
                return "object_detection"

        tasks = {
            "human_detection": human_detection,
            "object_detection": object_detection
        }

        # ...

        seq = robokudo.pipeline.Pipeline("WebStoragePipeline")
        seq.add_children(
            [
                base_tree,
                QueryBasedScheduler(tasks=tasks, filter_fn=task_selection),
                reply_tree
            ]
        )
        return seq