Tutorial 6 - Creating a more complex Annotator
Section 1 - Loading and using Machine Learning Models
In this tutorial you will create a more complex annotator that can detect
objects and humans by using the a pretained Machine Learning Model of the YOLO family.
YOLO stands for “You Only Look Once” and is a family of Machine Learning Models
that only get to process an image once for object detection. This means that
these models are relatively fast. The ultralytics library for python provides
the functionality to load a pre-trained model from a file.
We will create a new annotator called SimpleYoloAnnotator which you can find
in src/robokudo/annotators/simple_yolo_annotator.py. As in the previous
tutorials the update() and add_to_image() functions have to be implemented.
All necessary libraries are already imported for you. The most important new
type is the YOLO object. This object takes a single parameter representing
the name of the model file. In this tutorial we will use the file "yolov8n_7.pt".
The YOLO object will automatically load the model on initialization.
Task 6-1-1: Create a new class attribute
self.modelin the__init__()function. This should be a newYOLOobject.Task 6-1-2: In the update function load the
COLOR_IMAGEfrom the CAS into a variable by creating a deepcopy of it.
The color image can be used to run “inference”, meaning the model gets the image
data and returns its predictions to us. To do so efficiently we will use a
context manager provided by another machine learning library called torch.
torch is a lower level library that is also used by the ultralytics library
internally. Add this code in the update function after loading the COLOR_IMAGE:
with torch.no_grad():
This context manager disables some features that are not needed in this
tutorial and improves performance.
The object in self.model is callable. This means to run inference with it
we just have to call the model with a few parameters.
For this tutorial pass your image as a positional argument and the keyword
argument conf=0.9. The conf value is the minimum confidence percentage
needed for a result to be accepted. Meaning a prediction will only be returned
if the model is atleast 90% sure that the prediction is correct.
Task 6-1-3: Call the
YOLOobject inside of the context manager and write the results into a new variable for exampleresults.
The new variable will now contain a list of Results objects. One object
for every image we passed to the model. This means our list will only
contain a single instance as only a single image was passed to the model.
The Results object itself has an attribute called boxes containing a
of Boxes object. This object then contains the bounding boxes of the detected
objects. However they are still stored as torch.Tensor objects which have to
be converted to something we can access better. The Boxes class offers a few
functions for this:
Boxes.cpu()
This will move the tensors to CPU memory for example in case they are stored on the GPU memory. We are not using a GPU, but we will call this anyway to be safe.
Boxes.numpy()
This will turn all tensors in the Boxes object into numpy arrays.
Task 6-1-4: Load the boxes object into cpu memory and convert its tensors to a numpy arrays. Store the result in a variable like
results_npTask 6-1-5: Create a loop over
results_npan for every item do the following:Save the bounding box in a variable like
bboxin thexyxyformat by accessingitem.xyxy[0]Add a white rectangle to the
COLOR_IMAGEyou loaded in the previous tasks using the datapoints inbbox(Note: You dont have to implementadd_to_imageyet)Write the new
COLOR_IMAGEto the annotator outputs as done in the previous tutorials
Task 6-1-6: Create a new Sequence containing the
SimpleYoloAnnotator. Make it run on the query typeyolo-detectinstead of the current sequence on that query type.
The code for the SimpleYoloAnnotator could look something like this:
# ...
class SimpleYoloAnnotator(robokudo.annotators.core.BaseAnnotator):

    def __init__(self, name="SimpleYoloAnnotator"):
        super().__init__(name=name)
        self.model = YOLO("best.pt")

    def update(self):
        # Read out the input color image and create a copy
        visualization_img = copy.deepcopy(self.get_cas().get(CASViews.COLOR_IMAGE))

        # Use the context manager to improve performance
        with torch.no_grad():
            # Run inference on the color image from the CAS
            result_tensor = self.model(visualization_img, conf=0.9, show=False)[0]

        # Move the Results object to cpu memory and convert its tensors to numpy arrays
        result_np = result_tensor.boxes.cpu().numpy()

        # Iterate over all results
        for result in result_np:
            # Read out the bounding box in xyxy format
            bbox = result.xyxy[0]

            # Add the bounding box to the visualization_img
            visualization_img = cv2.rectangle(visualization_img, (bbox[0], bbox[1]), (bbox[2], bbox[3]), (255, 255, 255), 2)

        # Write the final image containing the newly created rectangles to the
        # annotator output
        self.get_annotator_output_struct().set_image(visualization_img)
        return py_trees.Status.SUCCESS
# ...
Section 2 - Classifying Objects and creating Annotations
Now that the object detection is working, we will implement object classification.
The best.pt model used exposes its available classes after loading in form of
a dictionary with numbers as keys. These numbers are ids for the classes. These
ids are returned by the inference, so this dictionary makes it possible to know
what the actual class name is. In our case the dictionary can be accessed
through the YOLO object we created in section one by using self.model.names.
Task 6-2-1: Create a new class attribute
self.id2namein the__init__()function containing the id to class pairs.
For each of the results we got out of the inference we now want to create
annotations. Since we are detecting objects the ObjectHypothesis will be used.
This annotation however can not store classification data so we will also attach
a robokudo.types.annotations.Classification to the ObjectHypothesis objects.
The class of a result can be read out through result.cls[0], which returns the
id that then has to be used with the newly created self.id2name to return a
class in textual form. We can also read out how much confidence the model has
in its prediction by reading out result.conf[0].
Every annotation in RoboKudo can also store its source annotator in the class
field source. This is usually set to self.name from within the annotator and
is useful in scenarios where you need to find out which annotator added the
annotation.
Task 6-2-2: Inside of the results loop store the class id and class name into two separate variables.
Task 6-2-3: Create a new
Classificationobject for each result and store the class name into its class fieldnameand the confidence into its class fieldconfidence. Also store the annotators source in the classessourcefield.
There is a lot of information that we can now put into the ObjectHypothesis.
We already have the bounding box for each object and we also know its type.
Because ObjectHypothesis inherit from the IdentifiableAnnotation we can also
store and object id that can be used to uniquely identify an annotation. For
now we will just use the index of the results list for this value. When there
are multiple sources of ObjectHypothesis however, the id has to be retrieved
in a different manner.
Task 6-2-4: Create a new
ObjectHypothesiswith the following dataThe class fields
sourceandidas explained aboveThe class field
nameshould contain the textual class namePass the bounding box to the
roi.roiobject in theObjectHypothesisAdd the
Classificationobject to theObjectHypothesis.annotationslist
Tip
The results bounding box is currently in the xyxy form, but the
roi.roi only has x, y, width and height.
Important
The bounding box coordinates are of type float, the roi.roi
however only takes in the type int
Now that we have a complete ObjectHypothesis we have to add it to the CAS
somehow so that other annotators can access these annotations too. To do so
you can add the annotation to the self.get_cas().annotations list.
Task 6-2-5: Add the newly created
ObjectHypothesisto theCAS
Tip
To make this a bit more efficient you can store the ObjectHypothesis
in a small list during the loop and add them all at once to the CAS by using the
extend function offered by lists.
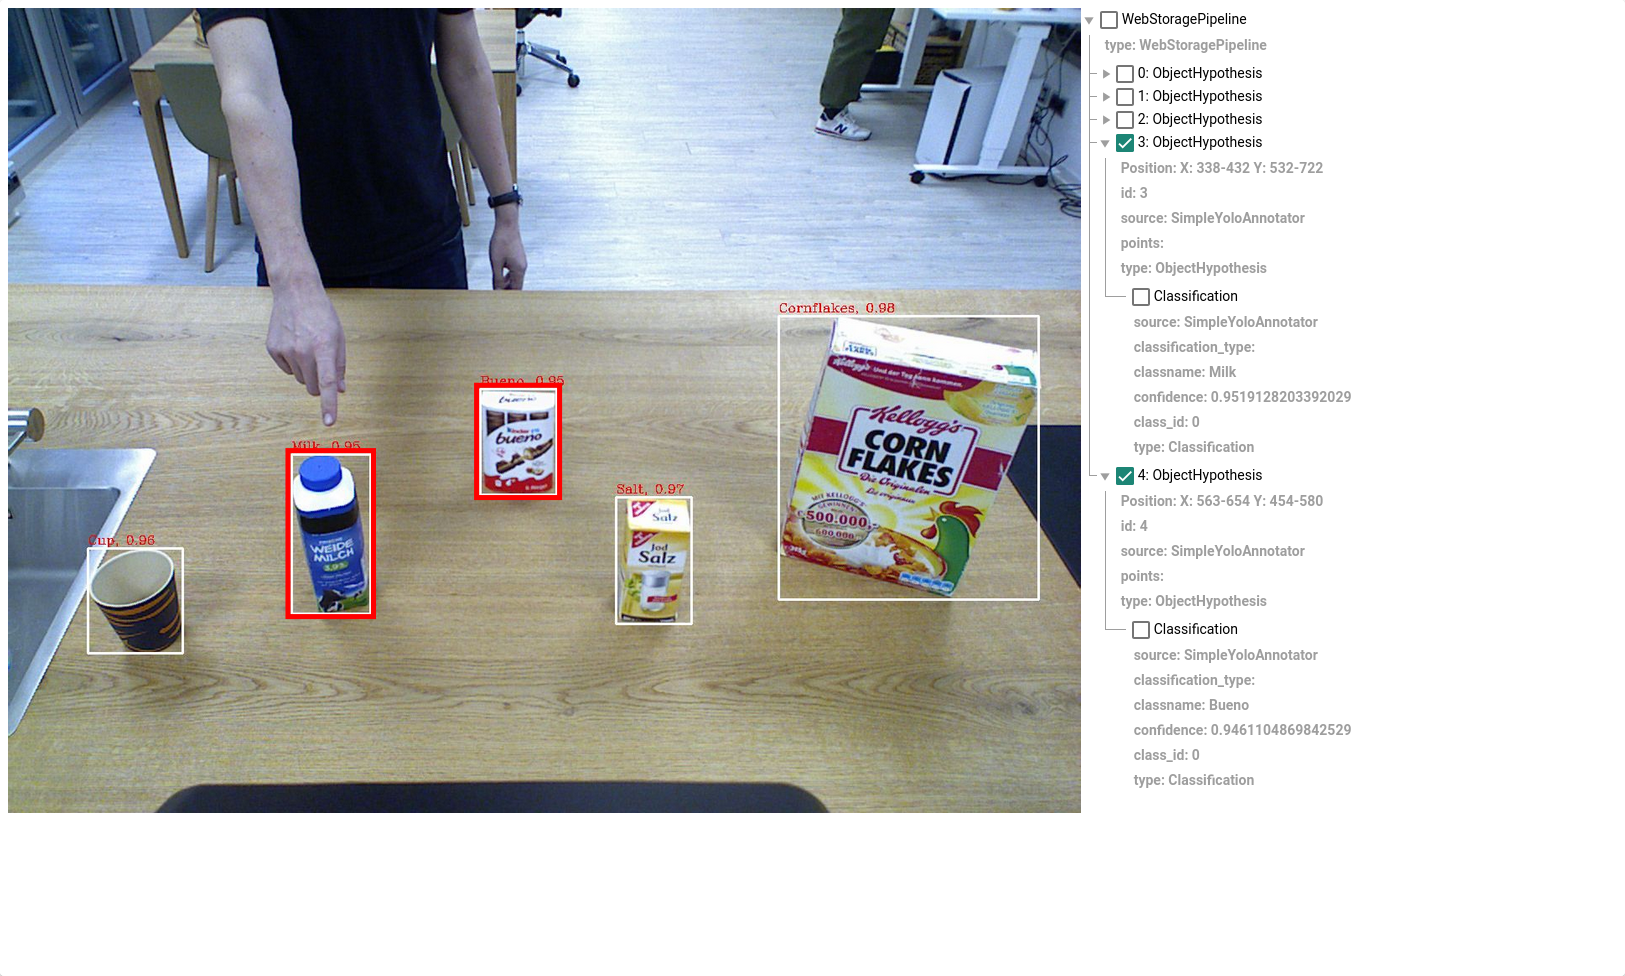
Task 6-2-6: Send a new
yolo-detectquery to RoboKudo and confirm through the details tree in the CAS output visualization that all the values you added to theObjectHypothesisare correct. This should includeThe objects source annotator
The objects position, which is derived from
roi.roiThe objects id
A Classification annotation with
The source annotator
The classname and class id
The confidence
Task 6-2-7: Implement the
add_to_imagefunction with the following criteariaThe bounding box should be added there instead of directly in the loop
Add a text to the bounding box containing both the class name and confidence
Task 6-2-8: Send a new
yolo-detectquery to RoboKudo and confirm that the bounding boxes and text are correctly added to the output image.
The final output of the annotator could look something like this:
The final code for the SimpleYoloAnnotator could look something like this:
# ...
class SimpleYoloAnnotator(robokudo.annotators.core.BaseAnnotator):

    def __init__(self, name="SimpleYoloAnnotator"):
        super().__init__(name=name)
        self.model = YOLO("best.pt")
        self.id2name = self.model.names

    def update(self):
        visualization_img = copy.deepcopy(self.get_cas().get(CASViews.COLOR_IMAGE))

        with torch.no_grad():
            result_tensor = self.model(visualization_img, conf=0.9, show=False)[0]

        result_np = result_tensor.boxes.cpu().numpy()
        object_hypotheses = []
        for obj_id, result in enumerate(result_np):
            bbox = result.xyxy[0]

            cls = result.cls[0]
            name = self.id2name[cls]

            classification = robokudo.types.annotation.Classification()
            classification.source = self.name
            classification.classname = name
            classification.confidence = result.conf[0]

            object_hypothesis = robokudo.types.scene.ObjectHypothesis()
            object_hypothesis.source = self.name
            object_hypothesis.type = cls
            object_hypothesis.id = obj_id

            object_hypothesis.roi.roi.pos.x = int(bbox[0])
            object_hypothesis.roi.roi.pos.y = int(bbox[1])
            object_hypothesis.roi.roi.width = int(bbox[2] - bbox[0])
            object_hypothesis.roi.roi.height = int(bbox[3] - bbox[1])

            object_hypothesis.annotations.append(classification)

            visualization_img = self.add_to_image(object_hypothesis, visualization_img)

            object_hypotheses.append(object_hypothesis)

        self.get_cas().annotations.extend(object_hypotheses)
        self.get_annotator_output_struct().set_image(visualization_img)
        return py_trees.Status.SUCCESS

    @staticmethod
    def add_to_image(obj, image):
        x1, y1, x2, y2 = (obj.roi.roi.pos.x, obj.roi.roi.pos.y,
                          obj.roi.roi.pos.x + obj.roi.roi.width,
                          obj.roi.roi.pos.y + obj.roi.roi.height)

        vis_text = f"{obj.annotations[0].classname}, {obj.annotations[0].confidence:.2f}"
        font = cv2.FONT_HERSHEY_COMPLEX
        image = cv2.putText(image, vis_text, (x1, y1 - 5), font, 0.5,
                            (0, 0, 255), 1, 2)
        image = cv2.rectangle(image, (x1, y1), (x2, y2), (255, 255, 255), 2)
        return image
Section 3 - Searching for objects
Detecting objects is already a good start. However it is even more useful to be
able to search for objects aswell. As already done in the previous tutorials
we will now implement another small annotator called ClassFilterAnnotator.
As the name suggests it is again used to filter objects depending on the query
that was sent to RoboKudo. This time we will use the obj.type field to search
for the different classes however. You can find the template annotator in
class_filter.py.
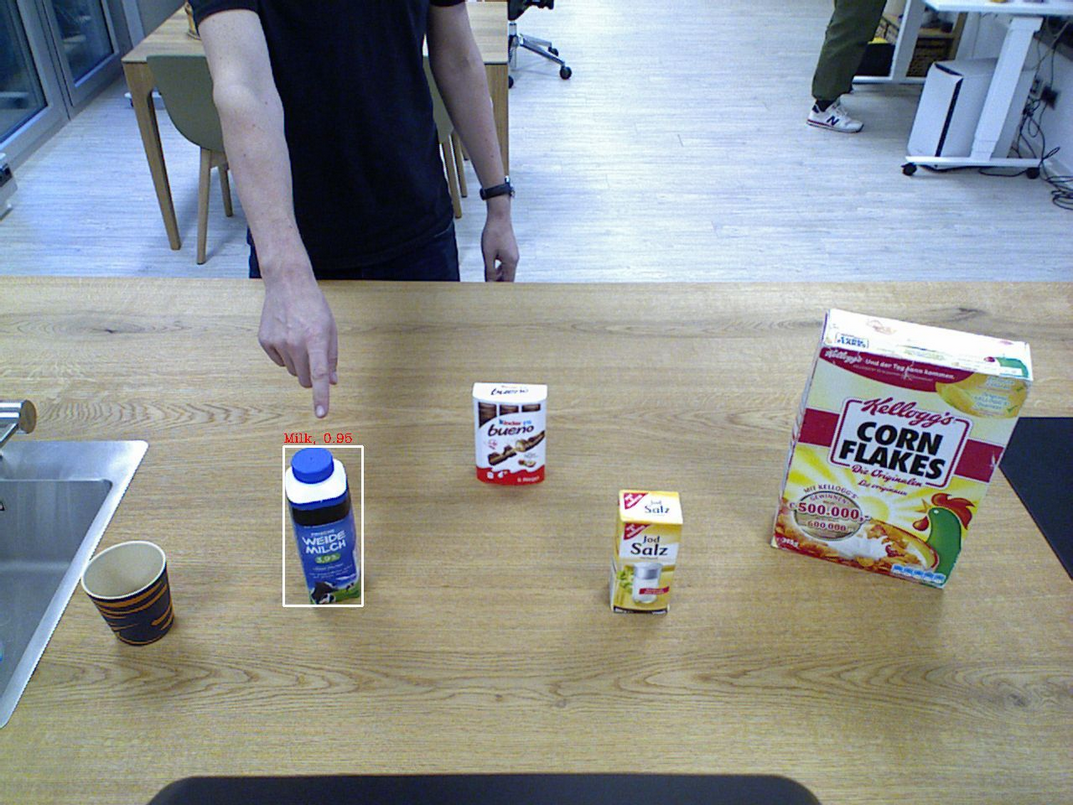
Implement the annotators
updatefunction so that the objects are added to the output image with theadd_to_imagefunction only ifobj.typeis equal to the objects classification.Add the annotator to the sequence after the
SimpleYoloAnnotatorand try to identify the milk by sending ayolo-detectquery while specifying a type.
The final output should look something like this:
The final code for the class_filter.py could look like this:
class ClassFilterAnnotator(robokudo.annotators.core.BaseAnnotator):
    # ...
    def update(self) -> py_trees.common.Status:
        query = self.get_cas().get(CASViews.QUERY)
        annotations = self.get_cas().filter_annotations_by_type(robokudo.types.scene.ObjectHypothesis)
        visualization_img = copy.deepcopy(self.get_cas().get(CASViews.COLOR_IMAGE))

        for annotation in annotations:
            for oh in annotation.annotations:
                if (isinstance(oh, robokudo.types.annotation.Classification)
                        and query.obj.type.lower() == oh.classname.lower()):
                    visualization_img = self.add_to_image(annotation, visualization_img)

        self.get_annotator_output_struct().set_image(visualization_img)
        return py_trees.Status.SUCCESS
    # ...